Set up IP cameras
- Set up IP cameras
- The steps to install IP cameras
- Ethernet card setup
- Install the Ethernet card
- Set Ethernet card IP address
- Connect IP cameras to the PC
- Camera setup
- Set camera IP address
- Set camera password and select power line frequency
- Create camera settings
- Create audio settings
- Select ONVIF cameras in MediaRecorder
- Adjust advanced video quality options
- Select devices that do not support ONVIF in MediaRecorder
Set up IP cameras
Main topics
- The steps to install IP cameras
- Ethernet card setup
- Camera setup
- Select ONVIF cameras in MediaRecorder
- Select devices that do not support ONVIF in MediaRecorder
The steps to install IP cameras
Prerequisites
- The network allows data transfer of at least 1 Gb per second.
- We recommend to use a dedicated network for the cameras.
- The cables must be suitable for Gigabit Ethernet. The minimum cable quality is CAT5e
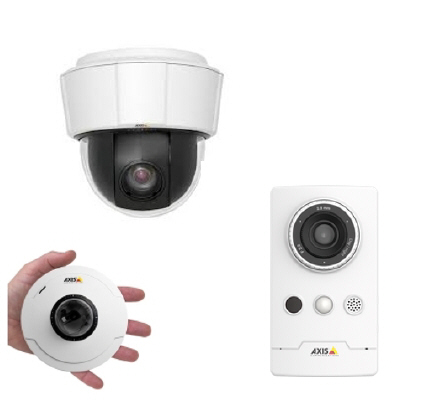
https://en.wikipedia.org/wiki/Category_5_cable - You have Axis IP cameras that are supported with MediaRecorder.
See Supported IP cameras in Recording devices
Which situation applies to you?
- You ordered computer, IP cameras and MediaRecorder at Noldus IT
The cameras are already installed. Also MediaRecorder has been set up to use with these cameras. You can connect your cameras and start recording.
See Record video
- You bought the cameras from Noldus IT and installed MediaRecorder on your computer
The camera IP address and settings have been created by Noldus IT. Carry out the steps in procedure below, except for steps 5,6,7, and 8.:
- You bought the computer and cameras somewhere else. Carry out the entire procedure below.
Procedure
- Install the Ethernet card
- Set Ethernet card IP address
- Connect IP cameras to the PC
- Set camera IP address
- Set camera password and select power line frequency
- Create camera settings
- Create audio settings
- Select ONVIF cameras in MediaRecorder
- or
- Select devices that do not support ONVIF in MediaRecorder
Notes
- The procedures apply to Axis IP cameras. If you bought cameras from a different brand, look for comparable settings in the camera manual.
- We recommend to use Axis IP cameras since these were tested with MediaRecorder.
- The Axis cameras sold by Noldus IT support ONVIF.
Ethernet card setup
Aim
To insert the 1 Gb Ethernet card into your computer and to configure it to work with MediaRecorder.

Prerequisites
- You have IP or GigE cameras.
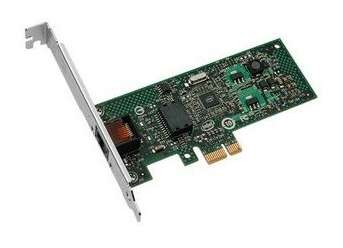
- You have an Intel PRO/1000 GT or Intel Pro/ 1000 PT Ethernet card.
- You purchased the computer with MediaRecorder yourself, or you bought the cameras after you received the computer.
If you bought a complete system from Noldus IT, the card has been installed and set up. You can skip this topic.
Procedure
Carry out the following steps:
Install the Ethernet card
Aim
To place the Ethernet card into the computer with MediaRecorder.
Prerequisites
- You have IP or GigE cameras.
- You have an Intel PRO/1000 GT or Intel Pro/ 1000 PT Ethernet card.
- You purchased the computer with MediaRecorder yourself, or you bought the cameras after you received the computer.
Procedure
- Turn off your computer and all connected peripherals, such as the monitor and printer. Make sure that the computer is unplugged.
- Remove the PC's case according to the instructions provided in the PC's user manual.
- Select a free PCIe expansion slot, and remove the corresponding extension cover.
See PCIe slot properties in Set up analog cameras for details in the slots in a Dell computer. - Unpack the Ethernet card, place it into the slot, and press it carefully into position. If the card does not fit into place easily, remove it and repeat the operation.

IMPORTANT When touching the board, its electronic components can be damaged by static electricity. To avoid any such risk, make sure that you are grounded. You can ground yourself by putting on an earthing wristlet, and attaching its clip to the metal frame of the computer. If an earthing wristlet is not available, you can hold the metal frame with one hand while holding the Ethernet in your other hand. Ensure also that your clothing does not touch any components while handling the card.
- Fix the card to the chassis and re-fit the computer's cover.

Set Ethernet card IP address
Aim
To set the IP address of the Ethernet card to the same range as the cameras and the computer.
Prerequisites
- You have IP or GigE cameras.
- You purchased the computer with MediaRecorder yourself, or you bought the cameras after you received the computer.
- You installed the Ethernet card into the computer.
See Install the Ethernet card
Procedure
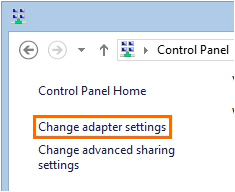
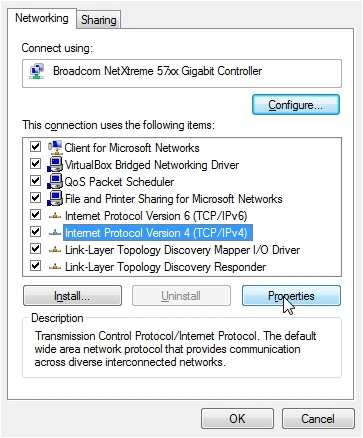
- Open the Control Panel and select Network and Sharing Center.
- Click Change adapter settings on the left side of your window.

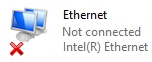
- Right-click Local Area Connection and click Properties. If your computer has more than one Local Area Connection, choose the one used for the cameras. To check which one this is, remove the cable from this IP port on your computer. The LAN connection that has the status Not connected is the correct one.

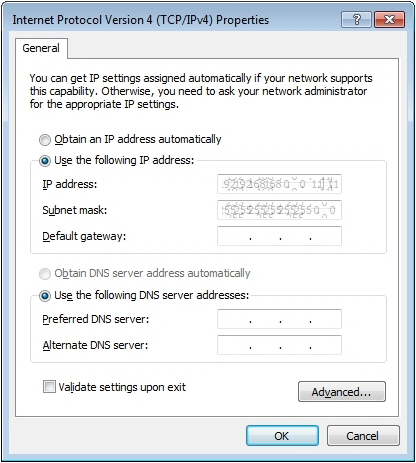
- Select Internet Protocol Version 4 (TCP/IPv4) and click Properties.

- Click Use the following IP address and enter the IP address and Subnet mask supplied by your system administrator. Leave the other fields empty. Also select the checkbox Validate settings upon exit. When done, click OK and then Close.

- A Windows Network Diagnostics window appears. Click Close when the validation is finished. Then close all windows.
Connect IP cameras to the PC
Prerequisite
You have followed the entire procedure in Ethernet card setup
Procedure
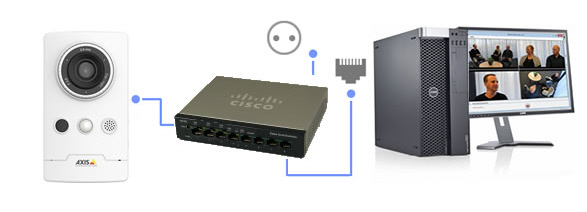
The procedure applies to a Cisco SG 100D 8 port Gigabit PoE-switch, which is supported with MediaRecorder.
Using cross-network cables (cat-5e or newer), connect the Ethernet card on the PC to one of the four right ports of the PoE-switch.
- Connect the camera to one of the four left ports of the PoE-switch. Do not use any of the four right ports for this purpose, since they do not supply your cameras with power.
- Power up the PoE-switch.
Notes
- The Power over Ethernet (PoE) switch is a device that receives and sends data (in this case, video data from the camera) and passes power along on twisted-pair Ethernet cabling.
- If you use multiple IP cameras, connect them to separate ports on the PoE-switch. Make sure the capacity of the switch is high enough for the cameras.
See Power over Ethernet in Recording devices
Camera setup
Aim
To configure the cameras for use with MediaRecorder.
Prerequisites
- You have Axis IP cameras that are supported with MediaRecorder.
See Supported IP cameras in Recording devices - You followed the procedure in Ethernet card setup
- You connected all cameras.
Procedure
You must carry out the following steps for each camera:
- Set camera IP address
- Set camera password and select power line frequency
- Create camera settings
- Create audio settings
Set camera IP address
Aim
To set the IP address of the camera to the same range as the Ethernet card and the computer.
Prerequisites
- You have Axis IP cameras that are supported with MediaRecorder.
See Supported IP cameras in Recording devices - You installed the Ethernet card.
See Install the Ethernet card
- You gave the card a fixed IP address.
See Set Ethernet card IP address
- You connected all cameras.
Procedure
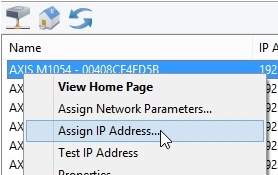
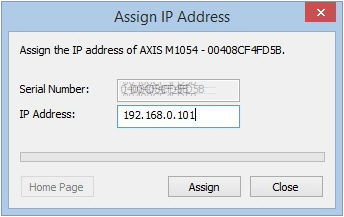
- Insert the MediaRecorder installation USB stick into your computer and copy the file IPUtility.exe from the folder Drivers and Tools\Software\Axis Tools to your computer. Do not copy it to your desktop, the tool will then not work correctly.
- Run IPUtility.exe. A window opens in which all the connected devices are listed.
- Right-click the device and select Assign IP address.

- Enter the IP address and choose Assign.

- According to the message that appears, disconnect and reconnect the camera and click Assign. Wait until the IP address is set.
- Right-click the camera and select Test IP address. When the details were entered correctly a message appears that the camera is accessible.
- Repeat steps 3 to 6 for all cameras. Make sure you use different IP addresses for all cameras and computer and other network devices in the network.
Set camera password and select power line frequency
Aim
To give the camera a password, which is compulsory, and to select the power line frequency of your country.
Prerequisites
- You have Axis IP cameras that are supported with MediaRecorder.
See Supported IP cameras in Recording devices
- You followed the procedure in Ethernet card setup
- You connected all cameras.
- You gave the cameras an IP address.
See Set camera IP address
Procedure
IP address
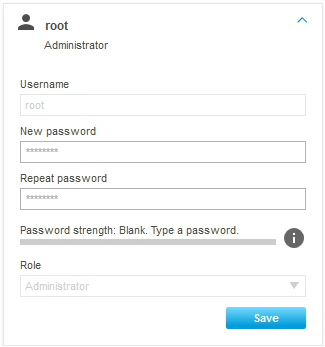
- In the IPUtility tool, click the Home Page button. the camera now opens in a browser.

Alternatively, type the IP address in the address field of, for example, Internet Explorer. - The first time you open the camera in a browser, you must set a password. If you obtained cameras from Noldus IT, this password is Noldus. The user name root cannot be changed. Do not use the characters @, space, or colon (:) for the password. These characters cannot be used in MediaRecorder.

- As soon as you set the password, you must log in to the camera with the password you just set.

Power line frequency
The first time you log in in the camera, you must select a power line frequency. Look up the correct power line frequency of your country on Internet.
Notes
- IMPORTANT Close the browser before you start recording. Leaving it open may cause recording problems in MediaRecorder.
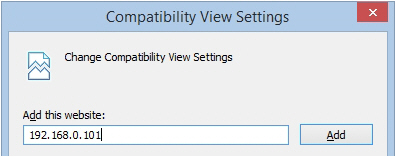
- If you do not get a view in Internet Explorer, click the Settings wheel in the upper-right corner of your window and choose Compatibility View Settings. Enter the IP address of your camera and click Add. Other browsers may have a comparable setting.
Create camera settings
Aim
To configure the camera for optimal recording with MediaRecorder.
Prerequisites
- You have Axis IP cameras that are supported with MediaRecorder.
See Supported IP cameras in Recording devices
- You installed the Ethernet card.
See Install the Ethernet card
- You gave the card a fixed IP address.
See Set Ethernet card IP address
- You connected all cameras.
- You gave the cameras an IP address.
See Set camera IP address
- You gave the camera a password and selected the correct power line frequency.
See Set camera password and select power line frequency
Procedure
Carry out the following steps:
- Access camera settings
- Create ONVIF User name and Password
- Disable replay attack protection
- Switch on IR cut filter
Note
The procedure below describes the camera firmware version 7.20.1. For other firmware versions, search for comparable settings.
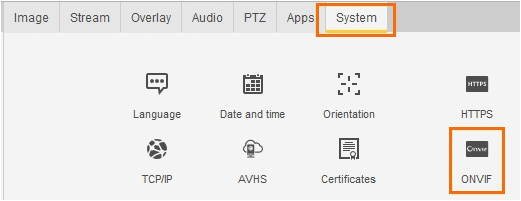
Access camera settings
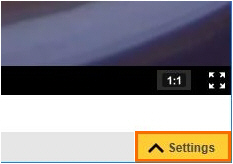
- Open the camera in a browser by clicking the Home page button in the IPUtility tool or typing the IP address in the address field of an Internet browser. Then enter the password.
- Click the Settings button in the bottom-right corner of your window.
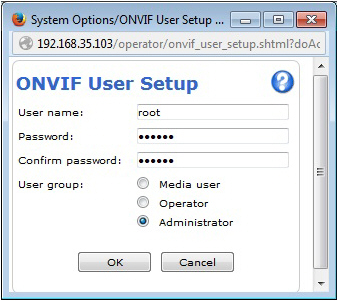
Create ONVIF User name and Password
Aim
To configure the camera so that pan, tilt, zoom, and audio recording is possible.
Procedure
- Open the camera settings.
- Open the System tab and click ONVIF.

- Click Add and enter the same User name and Password as set in Set camera password and select power line frequency. Do not use the characters @, space, or colon (:) for the user name or password. These characters cannot be used in MediaRecorder.
- Select Administrator as User Group and click OK.

Notes
- If the camera does not support ONVIF, pan, tilt, and zoom must be done with a browser and audio of the camera cannot be recorded. All IP cameras supported with MediaRecorder support ONVIF.
- IMPORTANT Always close the browser before you start recording with MediaRecorder.
Disable replay attack protection
Aim
To prevent that connection to the camera fails if the time of the MediaRecorder computer differs from the time in the camera.
Background
Replay attack protection is a camera security setting. Relevant for video recording with MediaRecorder is that replay attack protection causes the camera connection to fail if the timestamps of MediaRecorder and the camera are not exactly the same. Replay attack protection is necessary for security cameras, but not for IP cameras in a dedicated network.
Procedure
- Open the camera settings.
See Access camera settings - Open the System tab and click Plain config.
- From the list at the bottom, select WebService and click Select Group.
- Under WebService UsernameToken:, make sure the checkbox Enable replay attack protection is not selected.
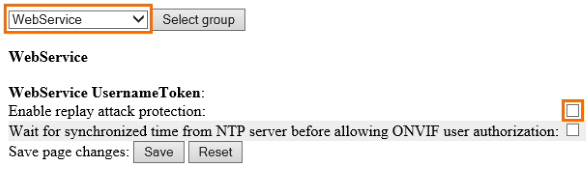
Note
If you do not want to disable this option, make sure that the clock times of the computer and camera are exactly the same.
Switch on IR cut filter
Aim
To make sure the cameras does not switch to black and white at low light levels.
Background
The IR cut filter removes infrared light during daylight. With the default camera settings, the IR cut filter is switched off at low light intensities. The camera then records in near-infrared, which gives a black and white camera image. If you do not want this, set the IR cut filter to On instead of Auto, so that it stays on, independent of the light level.
Procedure
- Open the camera settings.
- Open the Image tab.
- Check if there is an option IR cut filter. If so, set it to On.
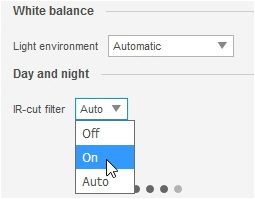
Note
Not all IP cameras supported with MediaRecorder have an IR cut filter.
Create audio settings
Aim
To optimize the recording volume.
Prerequisites
- You have Axis IP cameras that are supported with MediaRecorder.
See Supported IP cameras in Recording devices - You followed the procedure in Ethernet card setup
- You connected all cameras.
- You gave the cameras an IP address.
See Set camera IP address
- You gave the camera a password and selected the correct power line frequency.
See Set camera password and select power line frequency
- You followed the procedure in Create camera settings
Procedure
- Open the camera settings,
See Access camera settings - Open the Audio tab.
- Adjust the Gain slider and check in the Input section that the green field in the Level field is maximal with normal speech.

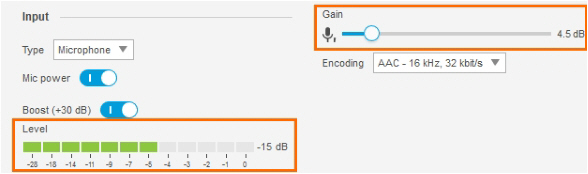
Note
You cannot record the audio of non-ONVIF devices in MediaRecorder. Optionally record audio from a separate microphone that is connected to the microphone input of the computer with MediaRecorder. The Axis cameras supported with MediaRecorder support ONVIF.
Select ONVIF cameras in MediaRecorder
Aim
To select a camera that supports ONVIF Profile S in MediaRecorder.
If your device does not support ONVIF, see Select devices that do not support ONVIF in MediaRecorder instead.
Prerequisites
- You have Axis IP cameras that are supported with MediaRecorder.
See Supported IP cameras in Recording devices
- You followed the procedure in Ethernet card setup
- You followed the procedure in Camera setup
- You installed MediaRecorder
See Installation
- You connected all cameras to the computer with MediaRecorder.
Procedure
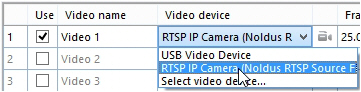
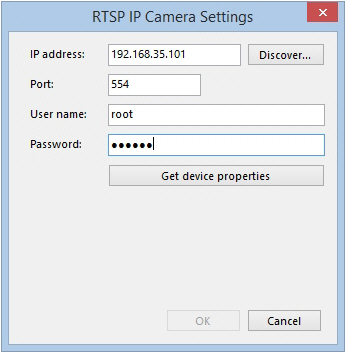
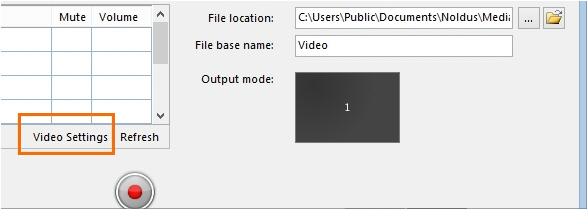
- Open MediaRecorder and choose File > Video Settings or click Video Settings.

- Select the checkbox in front of the video channel and choose RTSP IP Camera (Noldus RTSP Source Filter).

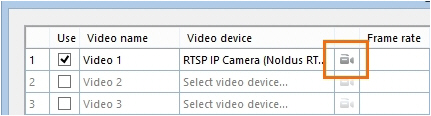
- Click the Advanced Video Settings button.

- A list with ONVIF cameras in the network appears. Select the camera.
- Enter the ONVIF User name and ONVIF Password for your camera. If you obtained cameras from Noldus IT, the ONVIF user name is root and the ONVIF password is Noldus.
TIP To select another camera, click the Discover button to display the list with ONVIF cameras in the network.
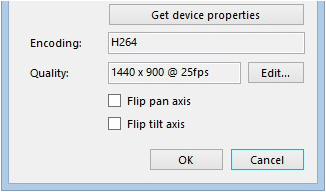
TIP If you have several cameras with the same ONVIF User name and ONVIF Password choose File > Preferences > IP camera settings. Select Use default IP camera user name and password and enter the credentials. You can now skip step 5 and 6, the camera is detected automatically. - Click Get device properties.

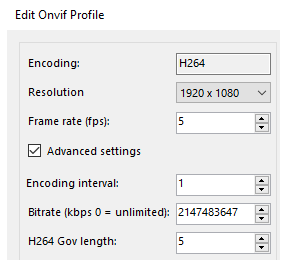
- The Encoding and Quality fields appears with the default video format, frame rate and resolution of the camera.

- Optionally, click Edit and select another frame rate or resolution. Click Update when done.
For low frame rate recordings, it is important to lower the H264 Gov length too on the same screen, under Advanced settings. For 5 fps, set the Gov length between 5 and 10, for 1 fps recording between 1 and 2. A lower Gov length will result in larger files but better image.
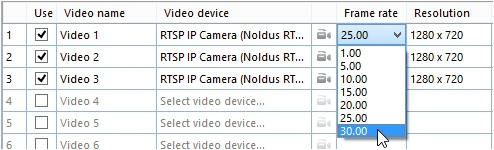
TIP It is also possible to change the frame rate and resolution in the table with selected video devices.
You may still need to adjust the Gov length for optimal results. - Optionally, adjust the video quality, for example to decrease the video file size, but we recommend to only do this when problems with video quality or data transfer over the network occur.
See Adjust advanced video quality options - .Click Close when done.
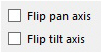
- You may want to reverse the direction the camera moves with Pan and Tilt). To do so, select the checkbox Flip pan axis (horizontal movement) or Flip tilt axis (vertical movement) or both.
- Click OK.
- Select the microphone from the Audio device list. To select the microphone from the camera, or a microphone connected to it, select RTSP IP camera (Noldus RTSP Source Filter) from the Audio device list.
- Close the Settings window and tap on the microphone. Check the green bar next to the video device to see whether you selected the correct microphone.
- Continue with Record video


Notes
- If you bought cameras yourself, see Create ONVIF User name and Password for the procedure to create an ONVIF user name and ONVIF password.
- If the default Port 554 is already in use, ask your system administrator for help to select another one.
- See Create audio settings how to adjust the recording volume.
Adjust advanced video quality options
Aim
To change video quality, for example to reduce the video file size.
Prerequisite
You experience problems with video quality or data transfer over the network. In all other cases, we recommend not to change the default settings.
Procedure
- Choose File > Video Settings or click Video settings.

- Click the Advanced Video Settings button.

- Click Get device Properties. This enables the Edit button. Click Edit.

- Select Advanced settings.
- Adjust the settings and click Update > Close.
- See Advanced video quality options for a description of the options.

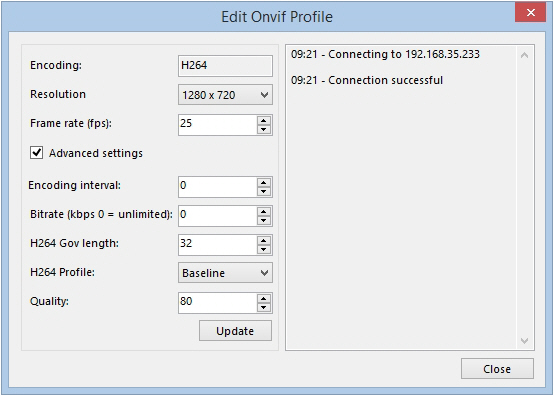
Advanced video quality options
If an option cannot be edited, your camera does not support other options, or the value is set by the chosen profile.
Encoding interval
This value cannot be edited and is set by the profile.
Bitrate
To set a limit to the data transfer. The default value 0 means unlimited. If you enter a value, data transfer is limited to this value in Kb per second.
H264 Gov length
The interval in which the I-Frames will be coded in the video file. A value of 1 means that every frame is an I-frame. A value of 2 means that every second frame is an I-frame. Decreasing the number increases the video quality, but also the data transfer. For a description of the frame types, see:
https://en.wikipedia.org/wiki/Video_compression_picture_types
H264 Profile
The encoding profile from the IP camera. MediaRecorder uses the Baseline profile and this option cannot be edited.
Quality
The quality of the encoded video file. Higher number gives higher encoding quality, but also more data transfer over the network.
Select devices that do not support ONVIF in MediaRecorder
Aim
To select a device that does not support ONVIF Profile S in MediaRecorder.
If your device does support ONVIF, see Select ONVIF cameras in MediaRecorder instead.
Prerequisites
- Your device does not support ONVIF Profile S
- You followed the procedure in Ethernet card setup
- You created comparable settings for you device as described in Camera setup
- You installed MediaRecorder
See Installation
- You connected your video device to the computer with MediaRecorder.
Procedure
- Open MediaRecorder and choose File > Video settings or click Video settings.

- Select the checkbox in front of the video channel and choose RTSP IP Camera (Noldus RTSP Source Filter).

- Click the Advanced Video Settings button.

- A list with available ONVIF cameras in the network appears.
IMPORTANT If your device does not support ONVIF, it will not be on this list. Click Cancel.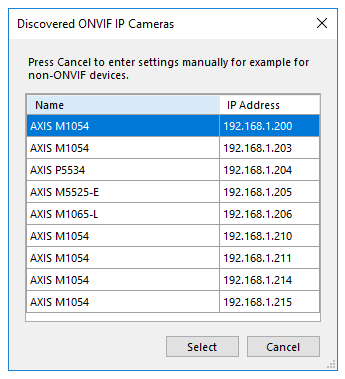
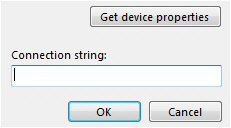
- Enter the IP address, User name and Password of the device. If you bought your device from Noldus IT, the User name is root and the Password is Noldus.
If the default Port 554 is already in use, ask your system administrator for help to select another one. - Click Get device properties.
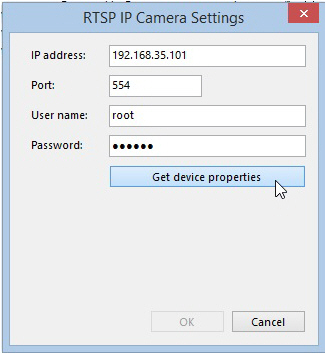
- The field Connection string appears.

- Look up in the manual of your device where the video files can be accessed via the RTSP communication protocol. Enter the path from the slash after the connection information in the Connection string field. For example,
/stream.sdp for an Epiphan Pearl Nano screen capture device/.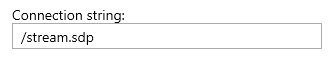
- Click OK. Optionally, select another frame rate or resolution. However, make sure you select the same frame rate as is selected in the device itself when you opened the camera in a browser (see the next step).
- Optionally, open the camera in a browser to pan, tilt, or zoom.
See Access camera settings


IMPORTANT Close the browser before starting recording with MediaRecorder.
- Click OK and continue with Record video