The Viso interface
- Log in
- Tabs
- Dashboard
- Locations
- Sessions
- Scheduler
- Codes
- Select locations for recording
- Select one location and record a session
- Select multiple locations to record separate sessions for each location
- Select multiple locations to record a composite session
Log in
aim
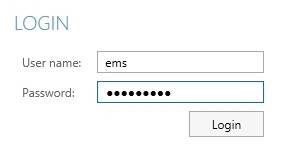
To start working with Viso you need to log in with the login name and password that you received from your colleague who manages the Viso set-up.
procedure
- Start Viso.
- Enter the login details supplied by your colleague who manages the Viso set-up.

Notes
- When you are logged in, your user name is shown in the top-right corner of the Viso window. Click it to change your password or log out.
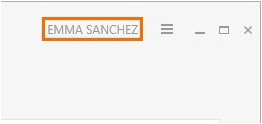
- TIP Change your password the first time you log in. To do so, click your name in the top-right corner and choose Change password. You can only change your password if you are a local Viso user.
- Contact your colleague who manages the Viso set-up if you have lost your password.
- You can only be logged in once in Viso, independent whether this is via the regular Viso interface or via the Viso Web App. If you log in a second time, you will be logged out on the other Viso instance or webpage.

Tabs

The Viso interface has the following tabs:
- Dashboard
- Locations
- Sessions
- Scheduler (if you have the Scheduler Module)
- Codes (if you have the Annotation Module)
Viso modules and user roles
The interface depends on your Viso license and your user role. The Scheduler tab is present when you have the Scheduler Module, the Codes tab when you have the Annotation Module. The Locations tab is present when your user role allows session recording.
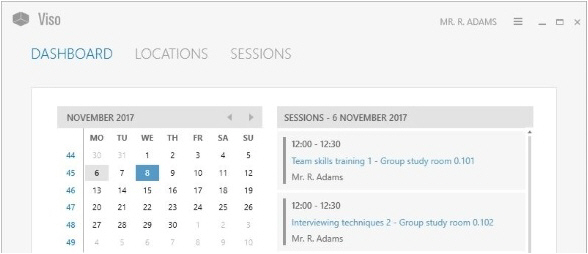
Dashboard
Viso opens with the dashboard which includes a calendar and a sessions list. Days in bold indicate when sessions that you created or received an invitation for were recorded. Click on a date in the calendar to view these sessions. A session that is being recorded or has been recorded has a link to open it.
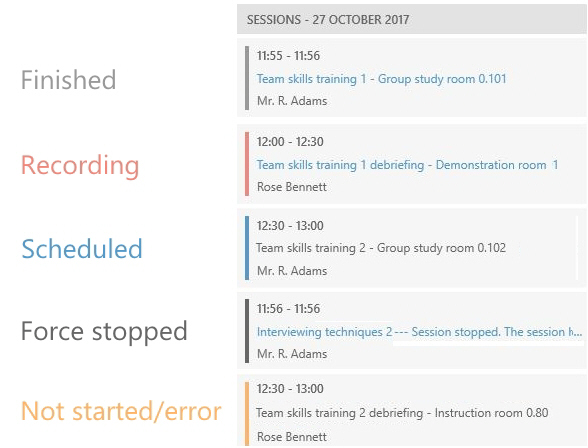
Session color coding
Recorded sessions are marked with a color in the Dashboard and in the Scheduler. The following colors are used.
Locations
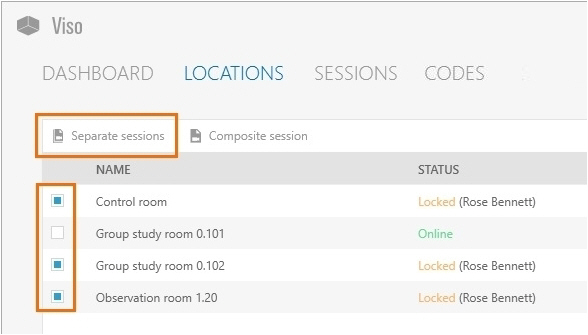
The Locations tab is present for those whose user role allows session recording. It contains a list of the locations that are set up by your colleague who manages the Viso set-up.

Double-click a location to open it and start recording.
See Sessions

Location status
Locations can have the following status:
- Online – Available for recording.
- Locked – The Location is opened by another user. Administrators and Technicians can open the location, but cannot start session recording. Trainers and Trainees can only open the location if they received an invitation for the session.
- Recording – Recording takes place in that location. Administrators and Technicians can open the location, but cannot start session recording. Trainers and Trainees can only open the location if they received an invitation for the session.
- Offline and grayed out – The location has not been selected for recording by your colleague who manages the Viso set-up.
- Configuration warning – One camera, or some of the cameras in the location are not configured correctly. Consult your colleague who manages the Viso set-up to solve this. You can record with the cameras that are online.
- Configuration error and grayed out – None of the cameras in the location are configured correctly. Consult your colleague who manages the Viso set-up to solve this. You cannot open the location.
NOTE For Technicians, the Locations tab contains an Edit locations button. Technicians can add and edit locations. See the Viso Setup Manual for details.
Sessions
The Sessions tab contains the list with recorded sessions that you are entitled to review. For Technicians and Administrators, the Session tab lists all recorded sessions. For Trainers, only the sessions that they created themselves, received session ownership of, were assigned as annotator for or received an invitation for are listed. For Trainees, the list contains the sessions they received ownership of, were assigned as annotator for or received an invitation for.
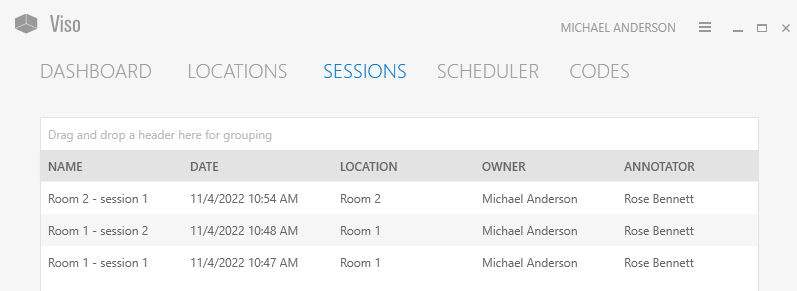
Double-click a session to open it for review.
See Review sessions
Scheduler
The Scheduler tab is available if you have the Scheduler Module. In this tab you can schedule your session recordings in advance.

Codes
The Codes tab is available if you have the Annotation Module. In the Codes tab you can create Codes lists with Subjects and Markers. This can be done by Technicians, Administrators and Trainers.

Use the codes list to annotate your sessions.
See Annotations
Select locations for recording
What do you want to do?
- Select one location and record a session
- Select multiple locations to record separate sessions for each location
- Select multiple locations to record a composite session
If you have the Scheduler Module, see also Schedule Session Recording.
Select one location and record a session
aim
To select one location for a single session recording.
prerequisite
Your user role allows session recording (Technician, Administrator, or Trainer).
procedure
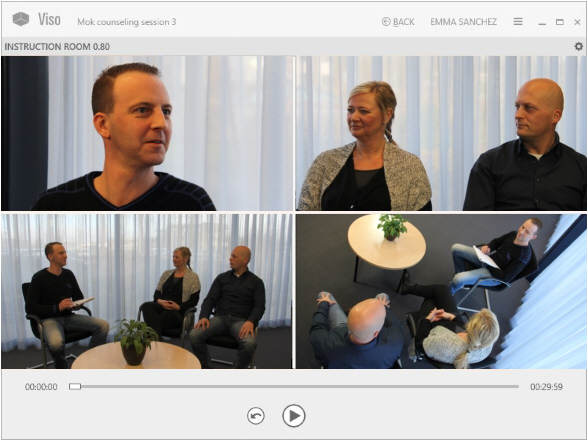
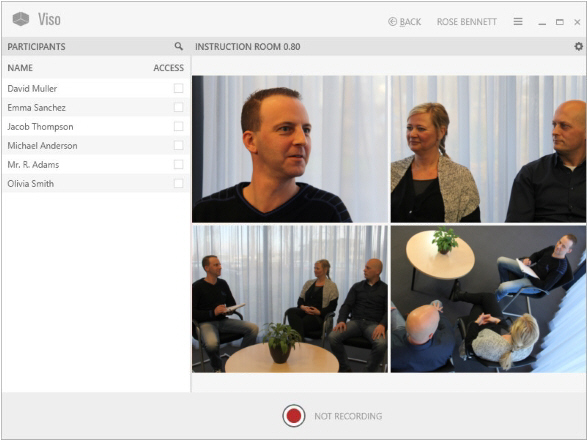
1. In the Locations tab, double-click the name of the location in which you want to start recording.

2. A preview of the cameras in the location appears. The toolbar displays the location name.
3. Continue with the third chapter of the Reference (Prepare session recording)
NOTE The location is locked for recording by others at the moment you select it in the Locations list.
NOTE You can also record a single session with the Viso Web App, see The Viso Web App
Select multiple locations to record separate sessions for each location
aim
To select multiple locations for simultaneous session recording. Each location results in a separate session.
Prerequisites
- The setup account enabled multiple-location recording.
- Your user role allows session recording (Technician, Administrator, or Trainer).
procedure
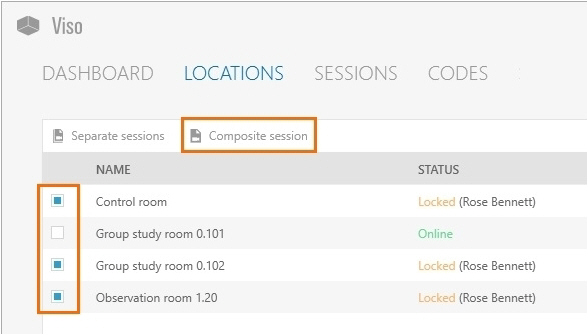
- In the Locations tab, select the locations.
- Click the Separate sessions button on the toolbar.

-
A preview of the cameras in the location that you selected first appears. The toolbar displays the carousel control.
The carousel control
The location you selected first is displayed in the middle of the carousel control.
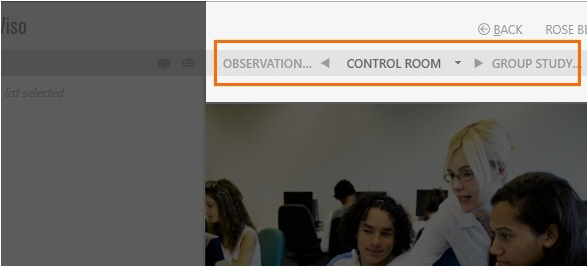
The location displayed on the right is the location you selected second.

The location displayed on the left is the location you selected last.

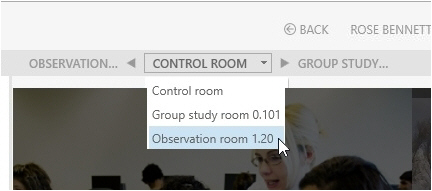
To open locations with the carousel control
Do one of the following:
- Press the carousel control buttons to browse through the locations.
- Press the Page up and Page down button on your keyboard.
- Click the down arrow next to the location in the middle and select another location from the list.
To set up the locations
See the third chapter of this Reference (Prepare session recording) for the procedure. Follow the procedure for each location.
NOTE If you selected only two locations, the second is displayed on the left as well as on the right in the carousel control.
NOTE The Separate Sessions button is enabled once you selected multiple locations. Separate session recording is supported with a maximum number of eight locations with two cameras each.
Select multiple locations to record a composite session
aim
To select multiple locations for simultaneous recording. All recordings are combined in one session.
prerequisites
- The Technician account enabled multiple-location recording.
- Your user role allows session recording (Technician, Administrator, or Trainer).
procedure
- In the Locations tab, select the locations.
- Click the Composite session button on the toolbar.
A preview of the cameras in the location that you selected first appears. The toolbar displays the carousel control.
See The carousel control and To open locations with the carousel control control to set up the locations
See the third chapter of this Reference (Prepare session recording) for the procedure. Follow the procedure for each location.
NOTE The Composite Session button is enabled once you selected multiple locations.
NOTE Composite session recording is supported with a maximum number of eight locations with two cameras each.