Welcome to Viso
- Welcome to Viso
- How to use this Help
- Introduction
- Important definitions
- User Management
- What's new in Viso 11?
- What's new in Viso 12?
Welcome to Viso
Main topics
- How to use this Help
- Introduction
- Important definitions
- User management
- What's new in Viso 11?
- What's new in viso 12?
How to use this Help
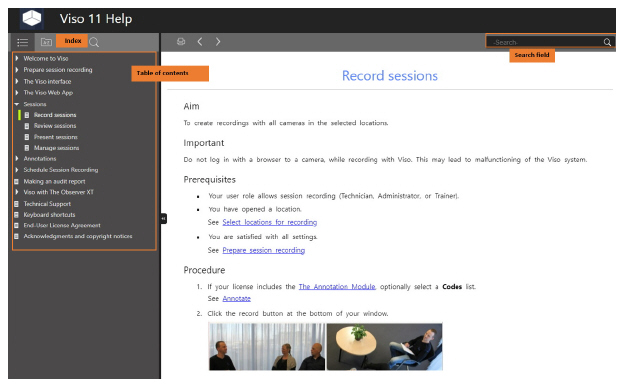
TIP If you do not see the table of contents, enlarge the Help window or zoom out the characters (Ctrl+mouse wheel, or Ctrl+-).
TIP To search for two or more adjacent words (e.g. review session), use quotes (“review session”).
Introduction
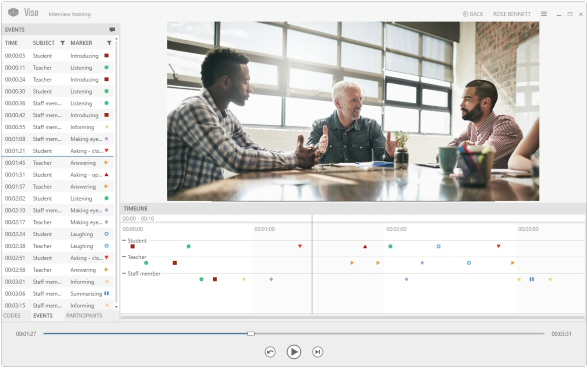
Viso® is a powerful tool to record video and audio in multiple independent locations. Record with up to four Pan-Tilt-Zoom cameras in each room. Control session recording from any computer in your local network, so that the persons under study are not disturbed by the recordings. Annotate the behaviors of the observed persons. Play the recorded sessions back for debriefing. And invite others to view the sessions with you.

Viso modules
Viso is modular, which means that you can make the setup entirely to your needs.
Base module
The Viso Base Module allows you to record sessions in a number of locations with up to four cameras in each location. The number of locations is determined by your license. User management ensures that session viewing, recording, or management can only be done by those whose user role allows it.
See User management for an overview of the rights of each user role.
Annotation Module
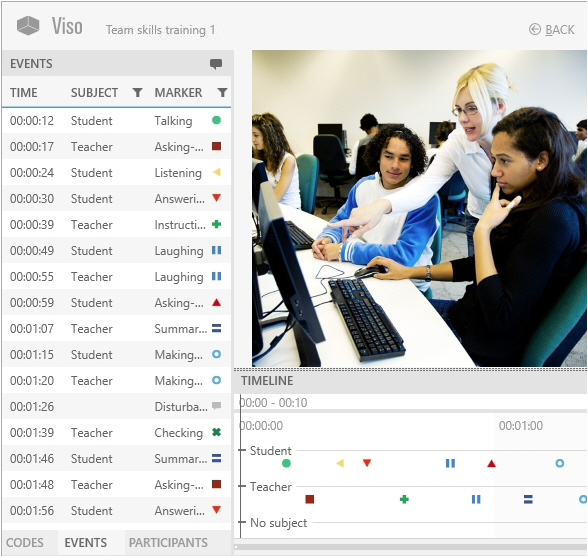
With the Annotation Module you can mark events that are of interest in your session and enter free text as remarks. When debriefing the session, you can easily jump to an episode using the scored markers and remarks.
The sessions can be exported to the annotation software The Observer XT, for further analysis.
Scheduler Module
With this module you can schedule sessions in advance. The Scheduler has several options to customize the view entirely to your needs.
Important definitions
IMPORTANT The terminology in this Help may differ from what you see in Viso, since your colleague who manages the Setup account may have changed it in the program. Locations may, for example, be called Rooms and Sessions Recordings. Also markers, subjects and user roles may have different names. Contact your colleague if you have questions on the terminology.
Location
A location is an area with cameras, for example an observation room, or a usability test room.
Session
By default, a Session is one recording with all cameras in one location. With the default settings, you obtain two or more sessions if you record with all cameras in two or more locations. However, those with a Technician account can select the option to start recording in multiple locations simultaneously.
Multiple-location sessions
Ask your colleague with the Technician account whether selecting multiple locations for simultaneous recordings is possible in your Viso setup. If this is the case, there are two options:
- Separate sessions – Viso records a session for each selected location. If you selected four locations, you will get four sessions.
- Composite session – Viso records one session for all locations combined. You will get one session, independent of the number of selected locations.
Department
A group of users who work together, using the same locations for recording. They can invite each other to watch live tests or recorded sessions. Users of a department only have access to the locations that have been assigned to that department. Users of different departments do not see each other in the software and cannot interact.
Group
By defining groups you can easily assign identical rights to a number of users, for instance, the right to view a session live or the right to review it after it has been recorded.
Subject
If your Viso license includes The Annotation Module, you can annotate sessions. Subjects are the individuals that show the behavior you are interested in. Examples of subjects are, Test participant 1, Mother, Father, Child, Doctor, Patient. Since the subjects are likely to vary between sessions, you define roles rather than names or identities as Subjects. So Mother and Child rather than Mrs Sanchez and Joanna.
Marker
If your Viso license includes The Annotation Module, you can score markers in your sessions. Markers are used to annotate events of interest, for example the start of a counseling session, or a usability test. Markers have no duration, they mark a moment in time.
Codes list
Subjects and Markers are organized in Codes Lists.
Remarks
If your Viso license includes The Annotation Module, you can enter remarks in your sessions in case something unexpected happens that you did not define as a marker. For example if a visitor enters the room. Like markers, remarks have no duration.
User Management
Viso has five user roles that differ in rights to work with the program. This ensures that actions in Viso, like managing users and locations, session recording, and session viewing, can only be done by those whose user role allows it. Users that have rights to create sessions can invite others to view them.
Your colleague who manages the Viso set-up specifies the user role of each user. The Viso Setup Manual contains a full description of the rights per user role. The table below summarizes the rights of the different user roles.
|
|
Setup |
Technician |
Administrator |
Trainer |
Trainee |
|
Manage terminology* |
|
|
|
|
|
|
Manage session recording options* |
|
|
|
|
|
|
Upgrade Viso license* |
|
|
|
|
|
|
Manage users* |
|
|
|
|
|
|
Manage locations* |
|
|
|
|
|
|
Force-stop recording* |
|
|
|
|
|
|
Manage departments* |
|
|
|
|
|
|
Define groups* |
|
|
|
|
|
|
Create Codes list a |
|
|
|
|
|
|
Record sessions |
|
|
|
|
|
|
Schedule sessions b |
|
|
|
|
|
|
View and review sessions |
|
|
|
** |
*** |
|
Manage sessions * |
|
|
|
** |
|
|
Log in via Viso Web App |
|
|
|
|
|
|
Start and stop recording with Viso Web App* |
|
|
|
|
|
|
Make an audit report |
|
|
|
|
|


* This information is present in the Viso Help.
a With the Annotation Module
b With the Scheduler Module
** Sessions that the Trainer has recorded, sessions of which he/she received session ownership, sessions for which he/she received annotator rights and sessions for which he/she has been invited.
*** Sessions of which the Trainee received ownership, sessions for which he/she received annotator rights and sessions for which he/she has been invited.
NOTE Trainees do not have the rights to schedule or record sessions and create codes lists. Therefore the tabs Locations, Scheduler, and Codes are not present for a Trainee.
What's new in Viso 11?
Allocate locations to departments
In Viso 11 we introduce the concept of departments. Your colleague who maintains the Viso set-up can assign locations to departments. Each location can be assigned to one department. The users (Administrators, Trainers and Trainees) that belong to a department can be linked to that Viso department. For instance, your school may have purchased a Viso system to train students in the field of nursing and students that study skin therapy. By assigning each student to one of the two departments he/she has access to the locations and sessions that belong to that department but not to the locations/sessions of the other department.
Group users
By defining groups you can easily assign identical rights to a number of users, for instance, the right to view a session live or the right to review it after it has been recorded. Groups can either be public or private.
Auto delete sessions
Your colleague who maintains the Viso set-up can set a time after which your sessions will be auto deleted. This is a GDPR/HIPAA requirement. You can secure sessions that you want to retain. These sessions will not be auto deleted.
Picture-by-picture view in Viso Web App
In Viso 10.7 you can view the cameras in a location simultaneously, in a picture-by picture view in the Viso Web App. In Viso 11 you can also view the videos of a session in a picture-by-picture view.
PTZ control in the Viso Web App
If your Viso set-up includes PTZ cameras you can now not only control them in the regular Viso software but also in the Viso Web App, including zooming in and out.
Transfer session ownership
Session owners can manage sessions (delete and rename sessions, etc.). You can give another user (for instance, your colleague) the right to manage your session.
Change session annotator
By default, the annotator is the person who recorded the session. This person can assign the role of annotator to a colleague or a student or reclaim the role of annotator.
Upgrading Viso easier
When your colleague who maintains the Viso set-up upgrades Viso from version 10.7 the Viso database is backed up automatically. The installation of Viso 11 consists of two steps, one step less than for older versions of the software.
Control Viso from The Observer XT or by using a programmable button
Session recording in Viso 11 can be started and stopped from The Observer XT, our tool for manual annotation and data integration. You can also use a programmable button to control Viso.
Secure RabbitMQ connection
Viso versions 11.0.8620 and higher allow the use of security certificates to secure RabbitMQ messages. RabbitMQ is a core item used in N-Linx, Noldus’ network communication protocol. It controls the message traffic between Viso Services, Viso Recorder and Viso Viewer. For information on how to set up a secure connection see ‘Install Viso Services with a secure connection.
What's new in Viso 12?
Software based licensing fully integrated in Viso
You can activate or deactive your software license from the Viso application directly.
Highlight videos
In the Annotation module, you can now create highlight videos which summarise the most interesting point events of your sessions to be used e.g. in presentations or lectures. To these highlight videos, you may add your markers and remarks as subtitles.
The right to manage recording options moved to Technicians
Those with a Technician account can now enable multiple location recording, including composite and separate sessions.
Allocate groups to departments
When creating groups, now the department where the group belongs can also be provided.
Data Transparency Policy
When a new user logs in, a pop-up window will appear, informing the user about Noldus's Data Transparency Policy.