Select ONVIF cameras in MediaRecorder
Aim
To select a camera that supports ONVIF Profile S in MediaRecorder.
If your device does not support ONVIF, see Select devices that do not support ONVIF in MediaRecorder instead.
Prerequisites
- You have Axis IP cameras that are supported with MediaRecorder.
See Supported IP cameras in Recording devices
- You followed the procedure in Ethernet card setup
- You followed the procedure in Camera setup
- You installed MediaRecorder
See Installation
- You connected all cameras to the computer with MediaRecorder.
Procedure
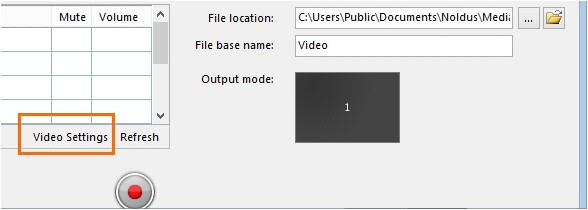
- Open MediaRecorder and choose File > Video Settings or click Video Settings.
- Select the checkbox in front of the video channel and choose RTSP IP Camera (Noldus RTSP Source Filter).
- Click the Advanced Video Settings button.
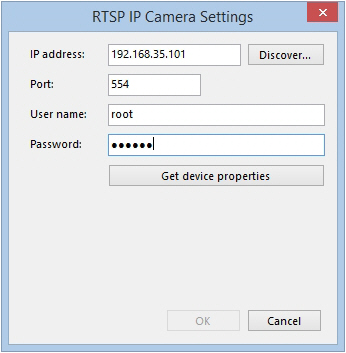
- A list with ONVIF cameras in the network appears. Select the camera.
- Enter the ONVIF User name and ONVIF Password for your camera. If you obtained cameras from Noldus IT, the ONVIF user name is root and the ONVIF password is Noldus.
tip To select another camera, click the Discover button to display the list with ONVIF cameras in the network.
tip If you have several cameras with the same ONVIF User name and ONVIF Password choose File > Preferences > IP camera settings. Select Use default IP camera user name and password and enter the credentials. You can now skip step 5 and 6, the camera is detected automatically.
- Click Get device properties.
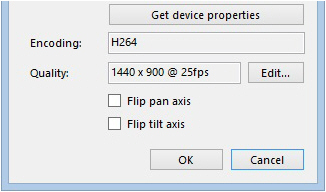
- The Encoding and Quality fields appears with the default video format, frame rate and resolution of the camera.
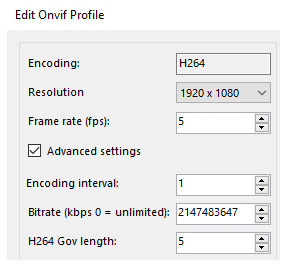
- Optionally, click Edit and select another frame rate or resolution. Click Update when done.
- For low frame rate recordings, it is important to lower the H264 Gov length too on the same screen, under Advanced settings. For 5 fps, set the Gov length between 5 and 10, for 1 fps recording between 1 and 2. A lower Gov length will result in larger files but better image.
tip It is also possible to change the frame rate and resolution in the table with selected video devices.
- You may still need to adjust the Gov length for optimal results.
- Optionally, adjust the video quality, for example to decrease the video file size, but we recommend to only do this when problems with video quality or data transfer over the network occur.
See Adjust advanced video quality options
- .Click Close when done.
- You may want to reverse the direction the camera moves with Pan and Tilt). To do so, select the checkbox Flip pan axis (horizontal movement) or Flip tilt axis (vertical movement) or both.
- Click OK.
- Select the microphone from the Audio device list. To select the microphone from the camera, or a microphone connected to it, select RTSP IP camera (Noldus RTSP Source Filter) from the Audio device list.
- Close the Settings window and tap on the microphone. Check the green bar next to the video device to see whether you selected the correct microphone.
- Continue with Record video
Notes
- If you bought cameras yourself, see Create ONVIF User name and Password for the procedure to create an ONVIF user name and ONVIF password.
- If the default Port 554 is already in use, ask your system administrator for help to select another one.
- See Create audio settings how to adjust the recording volume.


